Freeze Drying Tomatoes for Short & Long Term Storage

It’s been a little over a month since my new Small Harvest Right Freeze Dryer was delivered. I’ve finally completed my first few runs freeze drying tomatoes for short and long-term storage! I’m definitely still a beginner, but it’s amazing how getting a few batches under my belt has increased my confidence. Freeze dryers are pretty intimidating to me, and I spent the first few days after setting it up just kind of walking back and forth past the room it was in and peeking inside to look at it.
I found a few freeze-drying Facebook groups to join for tips and tricks and scoured them, looking for simple ideas to start with. I also discovered that it wasn’t just me. There are lots of other people out there who buy freeze dryers and wait weeks, months, and even years to build up the courage to use them. I decided to bite the bullet and just get started.
The Mandatory Bread Run
In the manual, Harvest Right tells you to run trays of bread through for your maiden voyage. This helps you know everything is running properly before putting anything too expensive inside. It also helps remove any residual odors left in the machine from the manufacturing process. Other than this first run, people rarely freeze dry breads and rolls, as they do not reconstitute well. I’ve seen people mention using the FD bread to make bread crumbs, but that doesn’t seem very cost-effective.
The machine is pre-programmed and self-sensing. Once the assembly is complete, you just plug it in and press “Start.” From that point forward, it will guide you through the process with step-by-step commands, including reminders to make sure the drain valve is closed. After it cooled itself for 15 minutes, I was prompted to close the drain valve and insert my loaded trays. I fit about 4.5 standard-sized pieces of store bread on each tray of my small-sized Harvest Right. t was room temperature when it entered the machine.
Is It Noisy?
As the mandatory bread load started its freezing cycle, I was pleasantly surprised at the noise level the machine put out. I have it set up in a spare bedroom across the hall from our master bedroom. I would compare the noise level to a window air conditioning unit. The bread took about 7 hours for the freezing portion to complete, then switched into drying mode. I have to be honest here. It gets quite a bit noisier at this point. On the bright side, it’s just a constant motor hum, so we haven’t found sleeping hard when a batch is running. It actually may even help a bit!
How Do You Know When It’s Done?
The machine’s software has an automatic additional two hours of dry time built into the end of the cycle. The screen display will count down for you when it reaches that point. I learned online that many Harvest Right owners customize their extra dry time to an additional 24 hours instead of the standard two. It provides an extra guarantee that the food is thoroughly dried and allows them to remove the trays when convenient for them. The machine itself will rechill your food if you cannot empty it as soon as the cycle has completed, so there are no worries that any items will be ruined if you aren’t home when your batch is complete. When you are ready to process the items, press a button to rewarm the trays.
It is very important not to remove any cold trays, as that means moisture may be present. To date, my machine is still using the default factory settings for everything. I definitely want to feel a bit more comfortable with the basics before tampering with any programming.
The bread run was complete after about 20 hours. Although it still looked exactly like the original bread, I was utterly stunned that the slices had almost no weight. Once I was done marveling, I felt some confidence and decided to get going on some real food. Here’s how the first two batches went!
I had just stopped by a local farmstand, and they had a package of 8 huge slicing tomatoes on sale for $4. These would have easily been $3 a piece in the supermarket. Tomato season was quickly drawing to an end, so I decided the first thing I wanted to preserve for long-term storage were these beauties.
Tomato Batch #1
I decided to lay parchment paper on the trays, as it seemed like that’s what a lot of people online were doing. It was pretty annoying to get the parchment down to size, and I didn’t like having scraps that were never going to get used, but I did it anyway. I’m guessing it’s a lot more convenient on the bigger models that have trays closer to the paper’s length. Amazon sells stacks of pre-cut sheets as well. I have them sitting in my ‘Saved For Later’ cart there. Before I spend any money though, I think I’ll try some batches on bare trays and see how things go.
I sliced the tomatoes about ½” thick and put them on in a single layer. I have done a lot of dehydrating, and items usually can’t touch each other on those racks. I was excited I wouldn’t have to worry about that with freeze-drying. One giant tomato fit per tray, so I could fit four into the load overall.
I popped them in at room temperature. To save time and energy, most freeze-dryer users prefer putting everything into the Harvest Right pre-frozen, but I didn’t have the freezer space available.
The Results
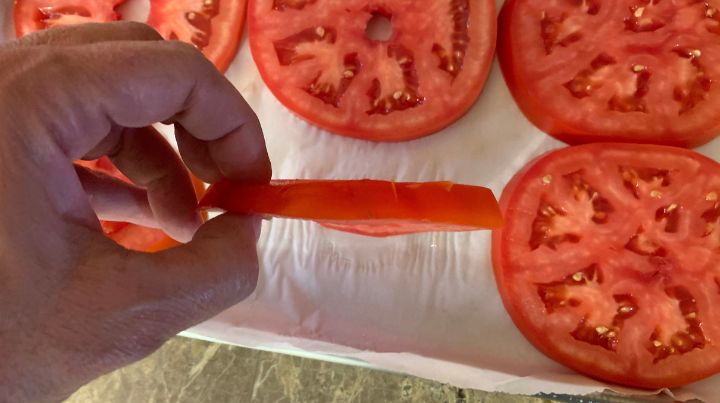
The freezing cycle took about 9 hours, and the overall run took just under 24 hours. Again, I was stunned by how they came out of the machine full-sized and vibrant in color but with virtually no weight whatsoever. Dying to know how one would be reconstituted for a mid-winter BLT, I dipped a slice into a bowl of cool water. I was back to a gorgeous, delicious, fresh-tasting slice of tomato in seconds. Literally seconds.
I loaded everything into mylar bags, added an oxygen absorber, and closed them up. I was eager to get the other four tomatoes into the machine, which I had sliced and ready to go. As I gently pressed on the Mylar to get some extra air out before sealing, I could hear the pieces breaking inside. I hadn’t really considered that before that exact moment. They would probably be pathetic partial pieces by the time I wanted that BLT. I knew that I might need to pivot from my original storage plans.
Defrosting Between Batches
I used the digital defrost cycle during my bread run, thinking it would shorten the time between batches. I chose to defrost this time manually, and I think it was faster. Once the ice in the chamber had started to melt, I removed the outer gasket, pulled the trays out (they’re still connected to the machine by a large cord, so you will need a very close place to rest them), and grabbed the interior ice ring out in chunks. After that was out, I wiped the trays and chamber down and dried them off. The gasket easily reattached to the outside, and I was ready for round two!
Batch #2 – Disaster #1
Since the first cycle of tomatoes seemed to go so well, I had a touch of the Dunning-Kruger effect going on inside my head. I thought I knew what I was doing and nothing could go wrong. That was not the case.
At some point, well into the drying cycle, I went in to take a peek at the machine. I must have bumped something on the display because it immediately fast-forwarded to the extra two hours of dry time at the end of the process. I did not know it then, but this happens when you touch the HR logo leaf in the top corner. Unsure what to do, I used the arrows on my screen to increase the additional dry time and hoped for the best. When I took them out, they looked just like my first batch, and I assumed everything was going well. That is, until I went to store them.
Long-term Tomato Storage
After I realized that my beautiful tomato slices would probably get pretty banged up in long-term Mylar bag storage, I decided to powder them instead. This way, I can use the powder to make a million different things but use much less storage space.
I learned online that many people like to powder their items in a large Ziploc bag with a rolling pin. Since everything crumbles so easily, there is no need to break out the food processor and create a pile of parts to assemble, disassemble, and wash. I grabbed a freezer-strength gallon-size bag and tossed some slices in from the second batch. As soon as I ran the rolling pin over the bag, I could see the slices beginning to reconstitute.
What I should have done when I bumped that HR logo leaf was to stop and restart the entire process. You can’t over-freeze-dry anything, so that would have saved my ‘maters. I’ve now learned that items with seeds, like tomatoes and berries, often need lots of extra dry time to completely pull the moisture out.
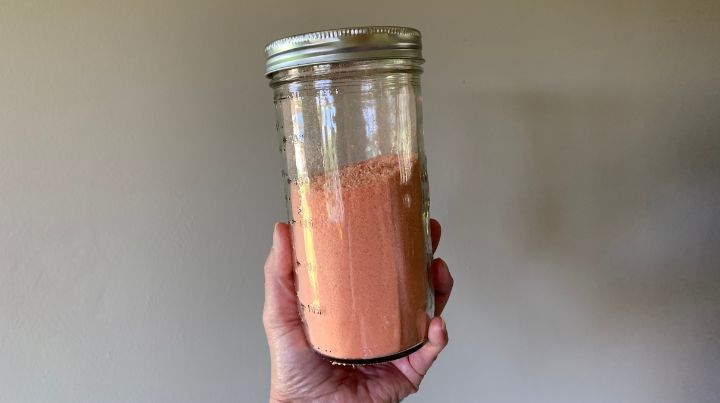
I threw that first bag away and decided I needed to open the Mylar bags from the first batch to see if both batches had a problem. Those original four tomatoes powdered beautifully. After the rolling pin and Ziploc, I filtered the powder through a strainer and repeated powdering until it all fit through. I have it stored in a Mason jar with an O2 absorber on a dark shelf in my pantry. The next time I do tomatoes, I’ll do them the same way, but keep the powder in small-sized Mylars and add them to my SHTF basement pantry.
Final Thoughts
Even with my mishap, I was pretty pleased with how the first batches went. I learned a lot along the way, both from research and from trial and error. I absolutely love having tomatoes on hand for long-term storage. Mostly, though, I’m excited that I’ll be able to preserve my food’s nutritional value so much more efficiently now. I can’t wait to share how my next few batches go in the Harvest Right!
What’s your favorite way to store and use freeze-dried tomatoes? Let’s talk about it in the comments!
Additional Resources:
Don't Miss Out!
Join the thousands of people who rely on Mind4Survival preparedness advice by subscribing to our FREE newsletter.
- Practical preparedness information
- Zero Spam
- < 0.25% of people unsubscribe


Join Mind4Survival!
Stay informed by joining the Mind4Survival! 100% Secure! 0% Spam!
Follow Us!
Affiliate Disclosure
Mind4Survival is a free, reader-supported information resource. If you make a purchase through our link, we may, at no cost to you, receive an affiliate commission.
To get as much air out of the bag, try this. Insert a straw into the bag snug against a side of the bag. Leave some of the straw out. Seal the bag up to the straw. Gently sealing the bag around the straw inhale air. If you need to inhale again stick your tongue on the end of the straw to prevent air from reentering the bag. When you have enough air out of, withdraw the straw and hold the opening tightly. Seal with heat.
Do not remove all the air with sharp edged food such as diced ham or chopped oranges. They make very tiny pinprick holes in the bag.
Harvest Right has a sale on for the rest of November 2023.