Emergency Shelter Considerations

Establishing a hierarchy of the pillars or aspects of survival based on their simple value can be next to impossible, thanks to the many variables related to context and the situation. However, while food, water, and fire are critical, it's well-accepted that an emergency shelter should be a priority. If we can't protect ourselves from the elements, then whatever other resources we have on us may not help much and become easier to lose.
Being in nature or outdoors is fantastic, but almost everything stings and hurts, particularly in the woods. Cold, heat, sun, rain, snow, darkness, vegetation, geography, hunger, loneliness, insects, and animals.
We aren't built to cope well with the harsh wilderness, and that's why cities and buildings exist. In the urban environment, we're generally more protected, though many of the same challenges are present for those who don't have a home: the weather, insects, animals, dirt, and trash – not to mention other humans. Therefore, shelter is equally vital in the city.
Emergency Shelter Considerations
Even though shelter should be considered primarily as a location and only secondarily as type (in other words, an average shelter in a good place is better than the other way around), a good spot alone doesn't always make it.
Finding a spot as safe, clean, and protected as possible is critical to improving any shelter used. Also necessary is concealment. In my opinion, it is as vital as any other criteria.
Finally, pay attention to exposure to elements to avoid issues with solid winds, lightning (and attracting structures such as trees, metal, etc.), rolling rocks, falling trees, branches, or snowbanks. Water sources can be an asset, but keep some distance to avoid trouble with excessive humidity, night colds, floods, and animals.
Outdoor Emergency Shelters
Finding (or building) a shelter in the city has its challenges, but it doesn't compare to building one from natural materials in the woods, which can consume large amounts of time and energy. Poisonous plants, animals, insects, spikes, splinters, cuts and bruises, etc. pose risks.
Of course, it's always possible to improvise something basic to protect from wind, rain, and snow or even utilize an existing cave or recess for immediate sheltering. But even when those are present, there are still challenges. The best way to build adequate protection from the elements is to carry materials with us.
In the city, it's possible to find “wilderness-like” spots in parks and other green areas or typical urban shelters such as under bridges or using the overhangs and recesses of buildings and other places. Not to mention, most cities have public facilities for the homeless with beds, showers, and food.
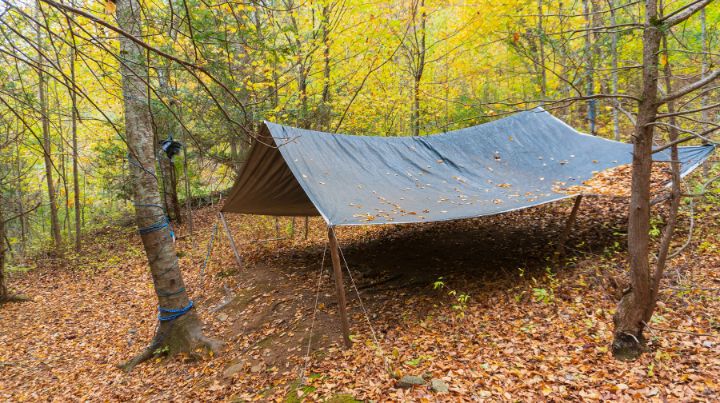
Tarps
Tarps are lightweight, versatile, easy, and simple to put up and take down. They can be improvised from a piece of waterproof material, something as basic as plastic or as sophisticated as Dyneema, with all sorts of silicone-impregnated nylons and polyesters in between (Sil-nylon and Sil-poly). Some will resist wind, water, and friction better than others, so choose according to the conditions. Most will last if appropriately handled.
Pitching a tarp has many ways, from classic and straightforward A-frames and Diamonds, to more complex Holden and Jordy styles. You can tie its corners to nearby trees or other anchoring points angled. The best one will depend on the size, anchoring points, poles, and other factors.
The most important things are to 1) Consider wind direction and 2) Stake and tie well. A wrongly and poorly pitched tarp will collect wind and rain or snow rather than protect from it (and possibly collapse at the worst time) or get trashed by the wind in the middle of a storm. A quick research on the internet will bring up lots of comprehensive guides on tarp pitching.
Ponchos
A poncho/cape is the easiest and quickest way to improvise a shelter anywhere. Some don't call it a proper shelter, but it will protect your body and gear (depending on the size), and that's what matters. A well-designed and built poncho is a versatile tool: it can be used as a tarp or rain collector, and allows you to move if it's raining or snowing while being lightweight and ventilated.
Some ponchos like Six Moon Designs Gatewood Cape tick all the boxes and can even be pitched as a tent with 35 sq ft of area, using only a pole that may be improvised from a branch or trekking pole. SMD even offers a net capsule for the Gatewood to keep bugs away. It has an excellent reputation among trekkers and backpackers for its versatility, design, construction, and lightweight (a mere 311g or 9oz).
I've often slept in the woods and streets with only a military poncho. It's not the most comfortable “shelter” and won't protect me from crawlies and insects (must use bug spray), but it keeps me relatively dry and warm. I like ponchos when I must be ready to leave in a hurry if I have to, for whatever reason. Keep in mind that ponchos can be uncomfortable in warm and humid weather.
Tents
Even one-person tents can be comfortable, convenient, and protective. They can be freestanding or staked, single or double-walled, with or without netting for bug protection, and come in various colors. I always advise green or earth-toned ones for discretion, as blending in is critical for OPSEC. Single-skin ones are lightweight but can suffer from condensation inside, even with proper ventilation. Double-walled tents are more comfortable but weigh more.
Cons of tents are weight, bulk, and complexity. They also require some practice to pitch regardless of type (freestanding or staked), and most have multiple components such as poles, netting, stakes, etc. On multi-day trips, they can be a pain to put up and down often, but mid and long-term stays are very convenient.

Hammocks
Modern hammocks offer some advantages: they're lightweight and compact, easy and quick to pitch, comfortable and versatile. They also keep us far from the ground (i.e., water, dirt, insects, animals, etc.), and some have netting enclosures to keep bugs away. I'm constantly switching between my hammocks (and tarp), 1P tents, and bivy-tents for my backpacking, camping, and bug-out dry run trips.
A few downsides of hammocks are the need for trees or other hanging spots, though these are common except in deserts and high mountains above the tree line. Also, hammocks require a canopy top (flysheet or tarp) to protect from sun, wind, and rain/snow. An insulation underneath is also important to keep the circulating air from robbing body heat through the thin fabric (known as frozen butt syndrome).
Bivys
Bivy comes from “bivouac,” or temporary open camp. Bivy-style sacks and tents are ordinary in the military and UL backpacking and make great short-term survival shelters. The low-profile camouflages perfectly into the vegetation, a considerable plus in dangerous areas and situations. That also helps with shedding wind, a bonus when it's cold.
Bivy sacks are waterproof “body bags”: they add heat and protect from splash and wind, but as with a hammock, a canopy is necessary to keep rain and snow off. Bivy tents such as Snugpack's Ionosphere (and its imitations) are roomier, more versatile, and heavier/bulkier than tarps and ponchos. Look for weatherproofing, weight, and correct size. Bivys can get hot really fast, so breathability and ventilation are critical, especially in warmer climates.
Emergency Tents
These are commonly made from Mylar foil, which is snow, wind, and waterproof, relatively resistant, and reflects back both body heat (inside, to keep warmth) and sun (outwards, to prevent overheating). Most emergency survival tents are triangle-shaped tubes, with some colored orange to help visually in case of a rescue or camo/olive green for blending in with the vegetation.
There are also emergency survival bivys, similar in shape to a sleeping bag. A combo of survival tent + survival bivy can be used for extreme conditions. Mylar is noisy, won't provide much comfort, and may last for a week or so depending on handling and care, but it's effective, lightweight, compact, and relatively inexpensive.
Bonus tip: Some of these shelters, such as tents, bivys, and emergency tents, can be used indoors to create more easily manageable micro-climates in case heating goes down from blackouts or other problems.
Final Considerations
It's tough to advise which type of shelter to go for in the city. As I say in my street survival training book, it's much easier to find refuge in the urban environment than in the wilderness. But most of that is just not there for us to use. It can be tricky, and trespassing can have consequences.
Some people living in the streets may not care for that, but someone trying to survive and get out of Dodge must consider everything. Almost anything is game as long as a few fundamental principles are observed.
- Take your time to study the place for potential hazards
- Avoid trespassing
- Stay out of sight (don't forget cameras!)
- Arrive early
- Leave earlier
- Have a way out
In the wilderness, semi-rural and rural areas, and around roads and highways, I'll camp on anything from abandoned, run-down houses, gas stations and other constructions, off-ramps, draining structures, deactivated cell network antennas; plantations, train tracks (not on the tracks of course, but around them).
Tarps can be improvised from heavy-duty trash bags and other pieces of plastic or canvas. Though moisture-absorbing fabrics can be used as insulation or wind barriers, they will make for very poor shelters in rain or snow, even in the short term. Same for cardboard and other paper-based materials.
I've seen various kinds of improvs in nature, the city, and everywhere in between. Preparing is important, but adapting and improvising is vital, too. You must consider the conditions in your area, know what to look for, and read the clues to find the best and safest places. It's a skill, and that's why it's essential to go out and get practical experience.
Additional Resources:
- The Best Emergency Sleeping Bag | Reviews and Guide (2023)
- The Best Army Poncho Liner | Woobie Guide & Review (2023)
- Best Military Sleep System: Sleeping Bag Facts & Info (2023)
- The Importance of Camping
Don't Miss Out!
Join the thousands of people who rely on Mind4Survival preparedness advice by subscribing to our FREE newsletter.
- Practical preparedness information
- Zero Spam
- < 0.25% of people unsubscribe


Join Mind4Survival!
Stay informed by joining the Mind4Survival! 100% Secure! 0% Spam!
Follow Us!
Affiliate Disclosure
Mind4Survival is a free, reader-supported information resource. If you make a purchase through our link, we may, at no cost to you, receive an affiliate commission.
Hi, intereresting comment about using bivy bags inside..
I used to have Retail outdoor stores.
We used Kilt Pins to enable Tents and Bivy bags to be set up on carpet.
Works very well without damaging carpet.