7 Best Freeze Drying Tips For Beginners

It’s been a few months since my small Harvest Right Freeze Dryer was first delivered. I’ve run about 16 or 17 loads through, and it’s almost time for my first oil change. There has definitely been a learning curve, but I’ve gained lots of freeze-drying tips through trial and error, and I thought it would be fun to share them with you today. I’m sure there is so much more to discover, but here are the best freeze-drying tips and lessons I’ve gathered so far.
1- It’s Less Expensive Than You’d Think
From the looks of my electric bill, the Harvest Right uses a lot less per load than I anticipated. Electricity costs are through the roof, so initially, I didn’t try to keep the machine in constant use like many other owners do. I was afraid I’d see a huge rise in my bill, and freeze-drying long-term would become unsustainable.
That is not true at all. Running a full load adds about $3.00 each time. That works out to about $.75 per tray. Each tray holds enough to fill a one-quart Mylar bag or Mason jar. Four quart-sized bags of freeze-dried food for $3.00? That is so much cheaper than buying long-term food storage from a company that sells it pre-packaged for you. I can run a load every three days and only add about $25-30 to my monthly bill. That’s a phenomenal price to pay for upwards of 40 packages of survival food.
2- Pre-freezing Is Totally Worth It
When reading up on my Harvest Right before running my first load, I noticed a lot of the freeze drying tips said to pre-freeze your loaded trays before putting them into the machine. Many recommended buying a second set of trays. This way, the next planned batch can be pre-freezing while the first batch is being finished. I did, in fact, buy a second set of trays along with my initial purchase. Unfortunately, my freezers are all loaded to the gills, and there is no good way for me to pre-freeze at this point.
As a result, my first few loads were done with fresh, room-temperature fruits and vegetables. The freezing time took about 7 hours each time. After that, the drying cycle begins. After a week or two, I decided I could get around the pre-freezing by running a batch using items I already had in my freezer. What a game-changer! I started with frozen corn, and the dry cycle was reduced by about four hours.
While I still don’t have enough room for pre-freezing, I’ve now done about half of my loads using items from my current frozen inventory, and the results have been the same each time.
Four hours saved cuts about 1/6 off of the total average drying time, so the energy savings are significant. Whenever possible, I recommend adding your items to the freeze-dryer as cold as you can get them. When I made mashed potatoes and wanted to run them through right away, I put the trays in the refrigerator for about 45 minutes. Even just having them pre-chilled seemed to cut the overall run time significantly.

3- Items With Seeds Take Forevvvvver
Seeds are designed to retain moisture, especially in fresh and frozen forms. As a result, freeze-drying items like strawberries and tomatoes can be extremely time-consuming.
My first two runs with my Harvest Right were sliced tomatoes. Summer was ending, and I wanted to preserve as many as I could for the cold winter months. When I removed the second batch, they seemed completely dry, but they began to rehydrate slightly as I packaged them. I have concluded that there must have still been moisture left in the seeds, and it began to leech through rather quickly.
As a result, when I ran sliced strawberries through, I added an additional 12 hours to the default dry time. I wanted to be sure they were thoroughly dry before packing them for long-term storage. It would be so depressing to open a package during a SHTF emergency and have it be spoiled. The extra dry time produced a perfect batch of berries. Going forward, I recommend always adding a significant amount of extra dry time to anything that contains seeds. If you are drying items like tomatoes, I recommend removing as many seeds before processing as possible.
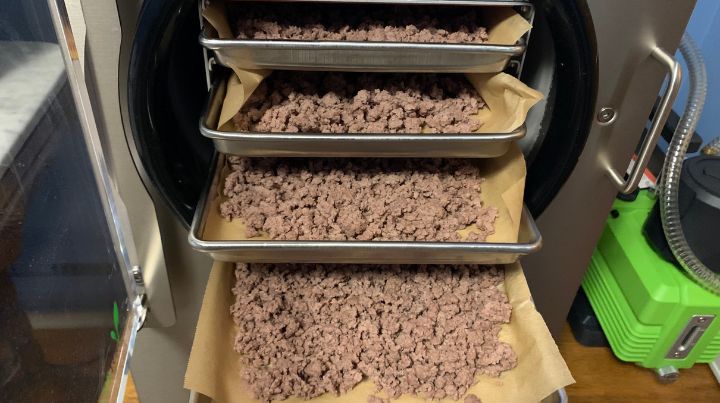
4- Freeze-Dried Ground Beef Makes Great Meals for One
Before I try to get fancy freeze-drying fully composed meals, I have decided to try to get a firm ingredient base into storage. Once I had a few runs of fruits and vegetables under my belt, I decided it was time to try some meats.
I purchased five pounds of 80/20 ground beef at our local farmer’s market and cooked it thoroughly on the stovetop in two batches. Since fat is usually the main culprit when freeze-dried foods spoil, I made sure to drain as much of the grease off as possible before loading up my trays. I managed to spill a large amount while draining it, so I had about four pounds (pre-cooked weight) left after that mini-disaster. I put about one pound on each tray and loaded them into my fridge for about half an hour while my machine worked on its pre-freeze cycle in the other room.
About 20 hours after loading the machine, the beef was fully dry. I packaged the first two trays into quart-sized Mylar bags and labeled them as holding the equivalent of one pound of ground meat each. Then it dawned on me. If I stored some of it in Mason jars, I could make a single barbecue sandwich or taco without thawing and cooking an entire batch! There are many nights when I am the only one home at dinner time, and cooking a whole meal seems overwhelming. Rehydrating a single potion of ground beef and adding some seasonings makes meals-for-one super easy now. It’s been an unexpected game-changer for quick and easy dinners.

5- The Defrost Cycle Isn’t Worth It
When your food is ready and a batch is complete, your Harvest Right will prompt you to see if you want to run a defrost cycle. The idea is that using the cycle will allow you to start your next batch much sooner. I’ve used it twice. It was after my first two loads. Then I noticed that I usually let the machine sit for at least a day before I began the next batch. The electricity I added to my bill to run the defrosting cycle was completely unnecessary. I did not use it on future runs, and I discovered the machine defrosts quickly on its own for zero additional costs.
If you are in a rush, I recommend letting the machine sit for about 30 minutes with the drain and door both wide open. Then, gently remove the front gasket. Pull the tray box out and rest it on a surface near the machine so you don’t have to disconnect any wiring. Gently tug on the ice ring around the main chamber. You should be able to remove it in large chunks and drop it into your drainage bucket to melt completely. Once the ice ring is gone, replace your tray box and gasket. You are now ready to run the next load!

6- Drain Tube Hack! Work Smarter, Not Harder
This is one of my favorite freeze-drying tips I’ve learned so far. The drain tube can get a little wonky during defrosting and sometimes likes to move around and come out of the bucket. With a small binder clip and a piece of masking tape, attach your hose to the side of your drainage container, and never spill water again!
7- There’s Lots of Help Out There!
Freeze-drying can seem overwhelming. When considering my Harvest Right, I worried that the process would be too complex and I would be unsuccessful in building the long-term food supply of my dreams. A friend recommended looking into social media groups dedicated to freeze-drying, and I’m so glad she did.
There are tons of Facebook pages and groups dedicated to answering any and all of your questions, no matter what your experience level is. Retired at 40’s Freeze-drying Group is my favorite, but there are many great ones to choose from. Here’s one where you can get direct responses from Harvest Right representatives! If you use social media, I highly recommend joining one or more of these online forums. If you are just starting out, look for groups dedicated to new owners. The comments are usually kinder there!
Bonus Tip * My New Favorite Guide *
I often worry that I will ruin all of my items when rehydrating because there doesn’t seem to be much information available about how it should be done. Online, the opinions differ so greatly it is hard to know who to trust. At Christmas, however, I received a gift from my parents that changed all that. Rehydration Calculations Made Easy by Wanda Bailey Clark is a must-have for anyone who owns a freeze-dryer. The book is packed full of rehydration formulas for thousands of items. Grabbing a copy now could save you lots of disappointment during SHTF.
Final Thoughts
While I’m sure there is so much more to learn, I’m excited and encouraged by my first few months with my Harvest Right freeze dryer. I just grabbed a new assortment of Mylar bags and hope to use the rest of the winter freeze-drying items that are taking up precious freezer space. I can’t wait for summer so that I can preserve so much more of my garden harvest next year!
Are you a freeze-dryer newbie or a seasoned expert? Share your best tips and lessons learned in the comments! Are you still thinking about getting a freeze-dryer of your own? What are the issues holding you back? Ask us below, and we will try to provide you with the answers you’re looking for!
Additional Resources:
- It’s Here! Freeze Dryer Delivery & Set Up
- Current Deals Direct From Harvest Right!
- Freeze-Drying Pros and Cons (From an Owner!)
- Is a Home Freeze Dryer Worth the Investment?
Don't Miss Out!
Join the thousands of people who rely on Mind4Survival preparedness advice by subscribing to our FREE newsletter.
- Practical preparedness information
- Zero Spam
- < 0.25% of people unsubscribe


Join Mind4Survival!
Stay informed by joining the Mind4Survival! 100% Secure! 0% Spam!
Follow Us!
Affiliate Disclosure
Mind4Survival is a free, reader-supported information resource. If you make a purchase through our link, we may, at no cost to you, receive an affiliate commission.